In this Showit tutorial, I am going to explain how canvas views work when it comes to your Showit website. I will also show you how to add a new canvas view to your website.
Choose your preferred learning style:
- Watch the video tutorial
- Read the blog post below
First, pin this post for later 📌

How to Use Canvas Views in Showit:
What are canvas views?
Canvas views allow you to layer information within a single canvas.
For instance, say that I have several testimonials that I want to display. Instead of displaying each one separately, I want them to appear on one canvas, fading in and out, one after the other.
This can be achieved using canvas views.
To show you how to add canvas views to your own website, I am going to be using this testimonial section as an example.
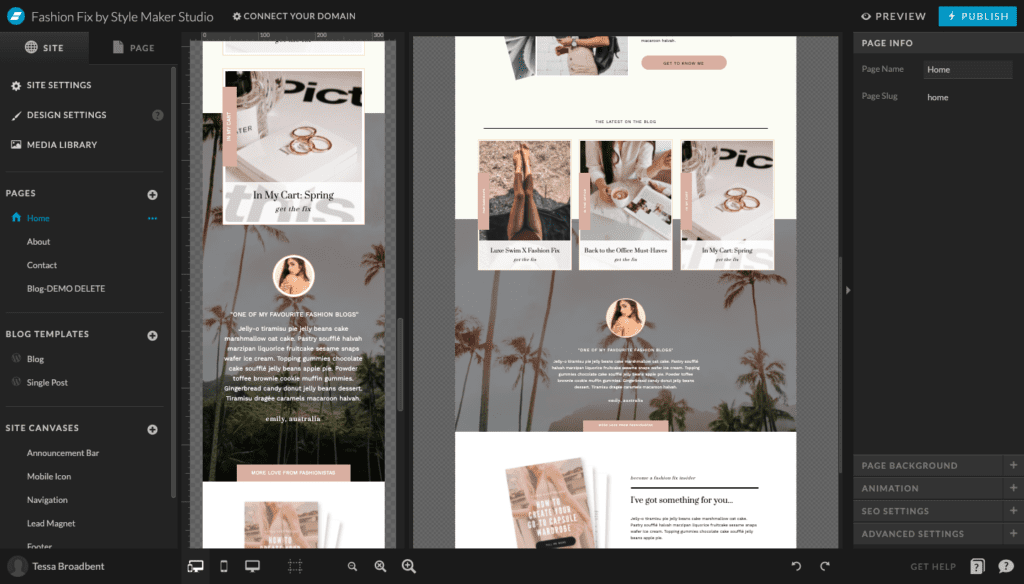
At the moment, I only have a single testimonial on this particular page. I would like to display several testimonials that my website visitors can click through.
Step One: Design canvas in both desktop and mobile formats
The first step is to design the canvas (in this case, the testimonial canvas) in both desktop and mobile formats. This makes it much easier when I am duplicating canvas views to add more testimonials and saves me from having to design each canvas view individually.
I can simply duplicate the canvas and update the content.
Step Two: Add new canvas view folder
The next step is to create the canvas view folder. We simply need to select the three dots next to canvas that we’re adding the folder to and select ‘add canvas view’ from the dropdown list.
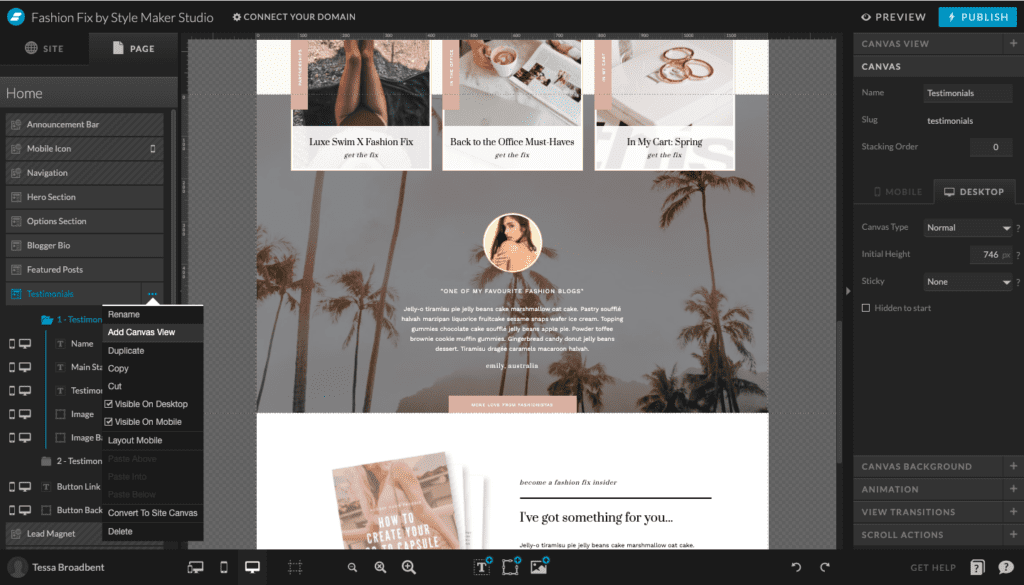
Step Three: Move elements into canvas view folder
We then want to move all of the elements into the folder. To do this we can either move each element individually, select all of the elements by pressing the ‘shift’ key or select all of the elements within the canvas itself by clicking and holding the cursor down to select all of the elements.
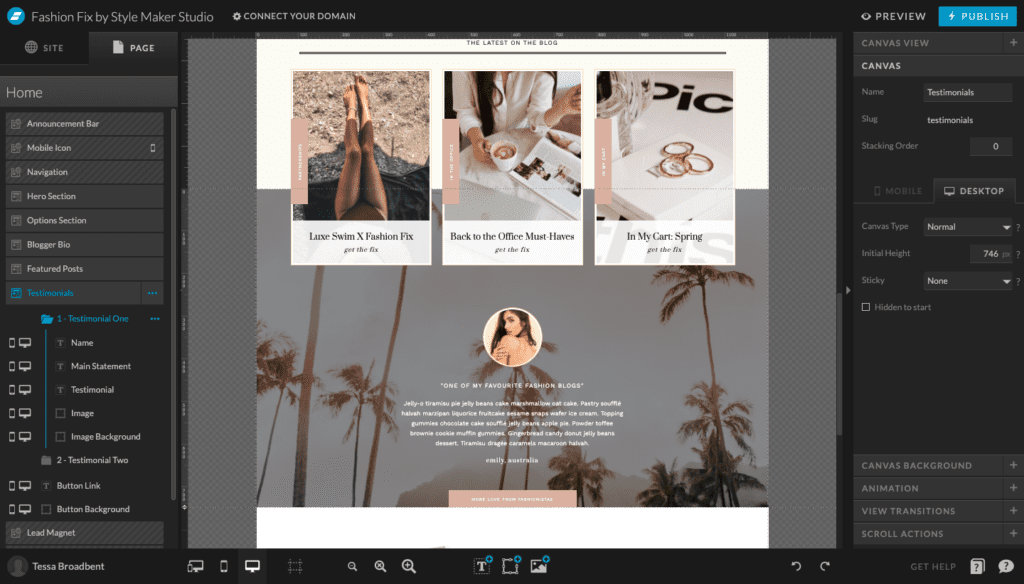
Anything that needs to change as we scroll through each view needs to be in the folder. For example, the text is obviously going to change, the client image, the client name.
Once everything has been copied into the folder, this will create our first testimonial. Canvas view one will automatically show by default. You can rename this folder if preferred e.g. ‘Testimonial One’
Step Four: Duplicate canvas view folder to create second testimonial
To create our second testimonial, we want to duplicate the folder. We simply click the three dots next to the folder and select duplicate. Once duplicated, we can edit the text, image, client name etc to create our second testimonial.
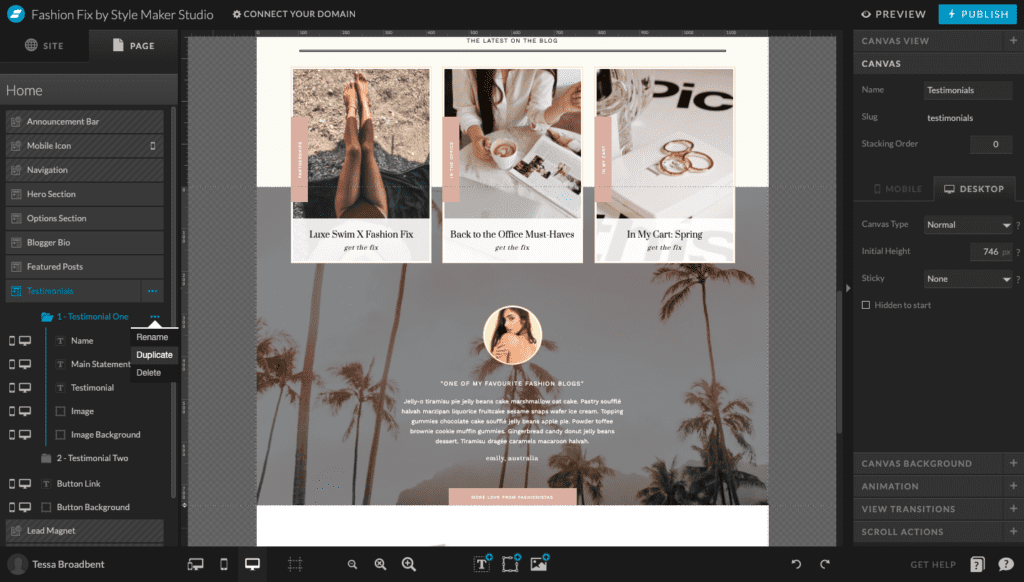
An important thing to keep in mind is when we edit the contents of the folders, we want to try and keep the top element positioned at the same point as we scroll through each testimonial. This applies to both desktop and mobile.
Keeping the positioning consistent will allow for a smoother transition as your website visitors scroll through each testimonial and look a lot more professional overall.
Ok, so for this particular example, given that each canvas view folder represents one testimonial, we can just go ahead and duplicate the folders depending on how many testimonials we want to display.
You can change the order of the testimonials at any time by holding the mouse down on the selected folder and dragging it to the next position. The number displayed next to each folder represents the order that the canvas views will appear in.
Step Five: Add Transition Settings
The next step is to add transition settings so that your website visitors can view one testimonial (or canvas view) one after the other. There are a couple of ways you can do this.
Option One: Automatic Transitions
The first option is to incorporate automatic transitions. This allows you to display each canvas view for a specified amount of time before switching to the next. This setting is commonly used for testimonials, however it is one that I wouldn’t recommend. I’ll explain why in a minute.
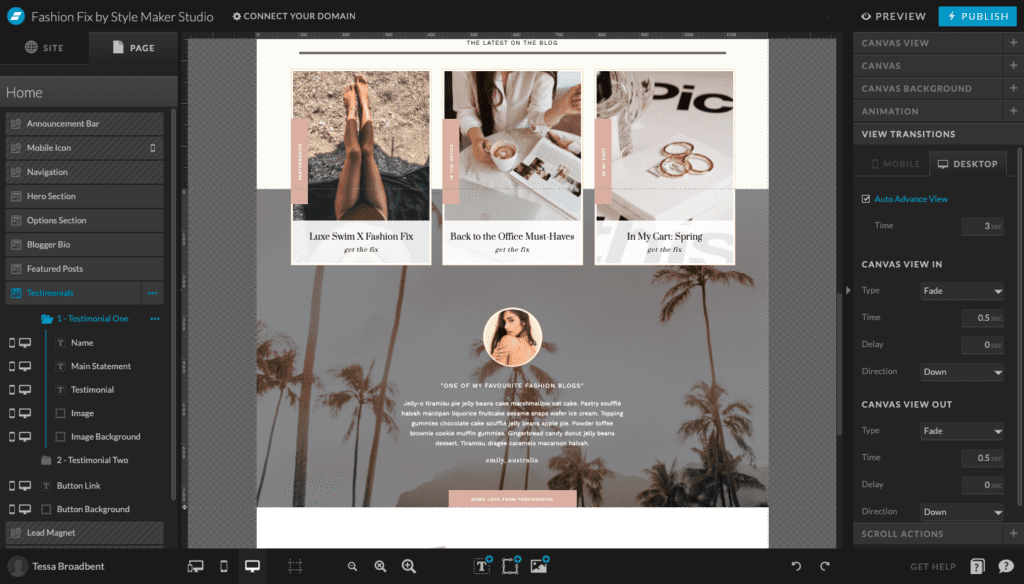
So to add automatic transitions, all you need to do is select the canvas containing the canvas view folders. Select ‘View Transitions’ from the right hand side menu.
Check the ‘Auto Advance View’ box – this is what will trigger the canvas view to transition automatically. Enter the number of seconds that you would like each testimonial to display for using the ‘Time’ field. Lastly, you can update the transition effects for how each canvas view appears and disappears – select from fade, slide, bounce, zoom, etc.
Here’s why I wouldn’t recommend using this feature:
Using automatic transitions can actually create a negative user experience for your website visitors.
There is nothing worse than being in the middle of reading a testimonial only for it to suddenly disappear and for another one to take its place. Unless you incorporate buttons, there is no way for the user to go back and finish reading the testimonial unless they wait for it to circle back to the beginning.
So, what should you do instead?
Allow users to click through the testimonials at their own pace using transition buttons. This will create a much better user experience and allow users to read your amazing feedback without being rushed.
Option Two: Transition Buttons
Showit allows you to add design icons such as arrows or even text boxes, so that users can toggle through each canvas view.
Unlike your testimonials within the canvas view folders, these design elements can sit outside of the folders (within the main canvas section). This prevents them from disappearing as the canvas views change.
Firstly, we need to add our icons. To do that we can hover over the design elements icon and select icon from the list. By default, it will import a smiley face icon from the Showit collection.
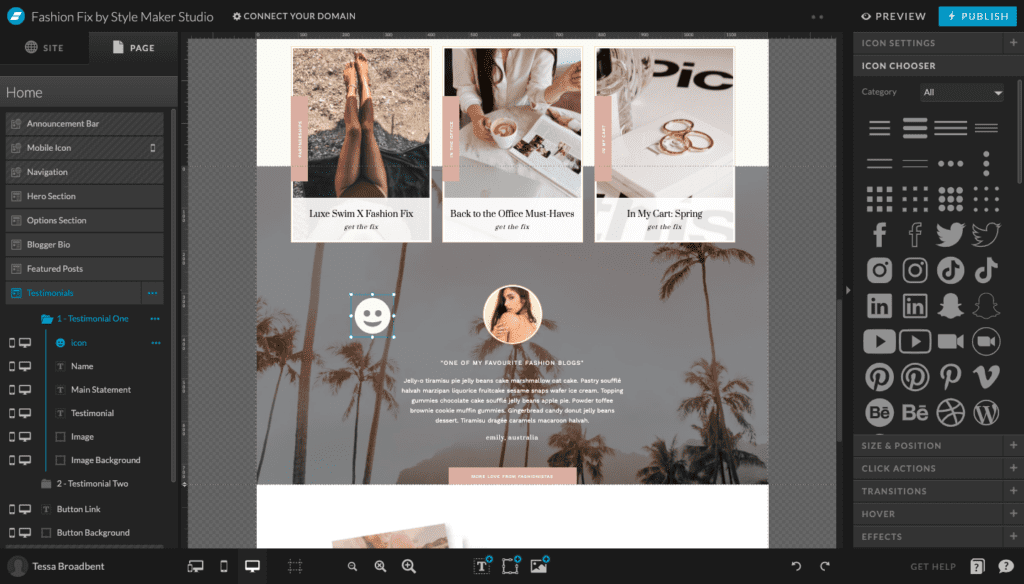
To change it, we simply need to select ‘Icon Chooser‘ from the right hand side and select our desired icon. I’m going to select the arrow icon. Now, I need one more arrow to create our button for ‘previous’ testimonials. To add another icon, I can either copy + paste or repeat the steps.
Both of the arrows will be facing the same direction to start off with, so we need to rotate one of them. To do that, we just go to the ‘Size and Position‘ tab and enter 180 to rotate it 180 degrees. Switch to mobile and do the same.
For convenience purposes, we can then go ahead and rename our icons in the left hand menu to Left Arrow and Right Arrow. This also makes it much easier to identify the correct icons when we switch to mobile view.
Our arrows are currently sitting in canvas view folder one by default. We need to drag them out of the folder so that they stay on the screen as your website users are scrolling through each testimonial. So, we can just select both arrows and drag them below the folders.
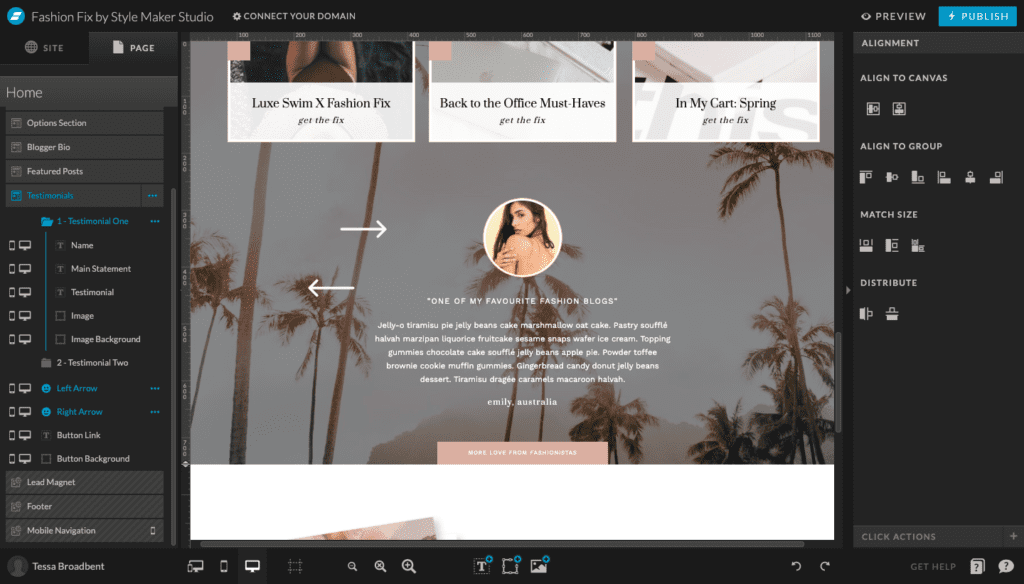
Now we can resize and reposition. With both arrows selected, we can simply drag the corners of the boxes in to reduce the size. Switch to mobile to do the same. We can then reposition them on the canvas.
Finally, we want to add the click actions. Select the ‘Right Arrow‘ and go to ‘Click Actions‘ on the right hand side. Select ‘Canvas‘ as the link type. Select ‘This Canvas‘ and then select ‘Next’ for the canvas view.
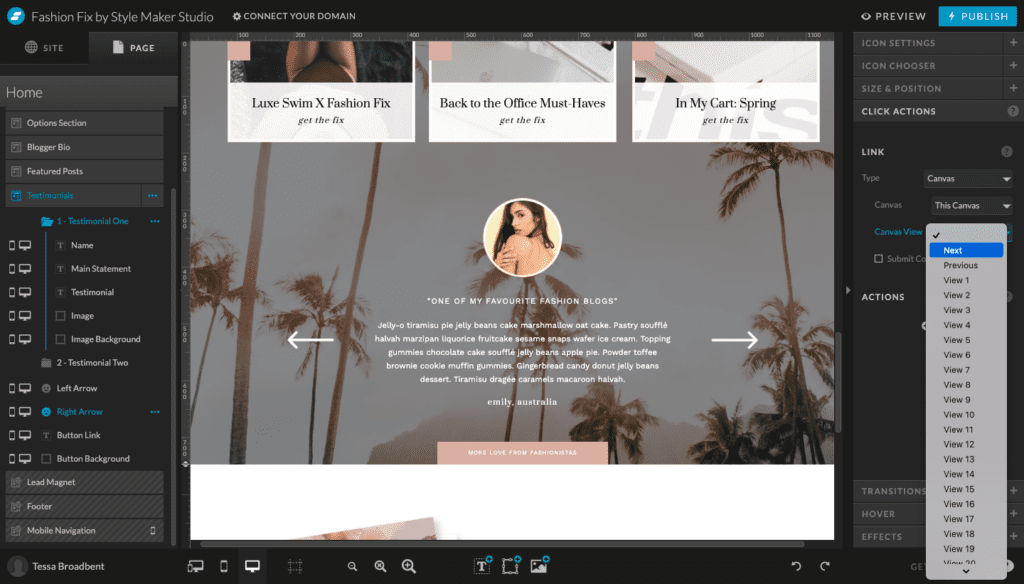
Uncheck ‘Scroll to Canvas‘ to prevent the canvas from jumping as your users are scrolling through the testimonials. Repeat the same steps for the ‘Left arrow’, but select ‘Previous’ as the canvas view.
Once you’re done, preview your updates to make sure everything is working and select publish when you’re ready.
I hope that you found this free Showit tutorial helpful. Feel free to leave any comments or questions below – I would love to hear from you.
If you want more Showit tips and tutorials, don’t forget to subscribe to my YouTube Channel and press the bell icon so you get notified each time I upload a new video.


